

Non-moving (static) cracks and holes with running water or moisture seepage For immersion service For anchoring vertical bolts Basements Foundations Retaining walls Sewers Locations Vertical, overhead, or horizontal Interior or exterior Above or below grade… (TDS p.1)
Step-by-step solution
Overhead water tank (drinking water)
Rooftop RCC tanks that leak, wet the ceiling below or show rust stains. Repair the concrete first, then line the inside only with products whose data sheet allows drinking-water contact.
- 6 steps
- 4 products
- 5 answers
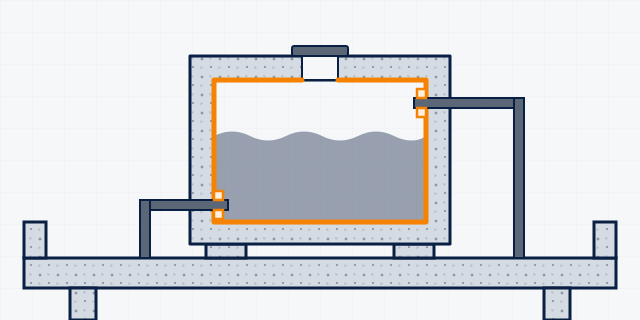
How the system works
The problem, and the system that solves it
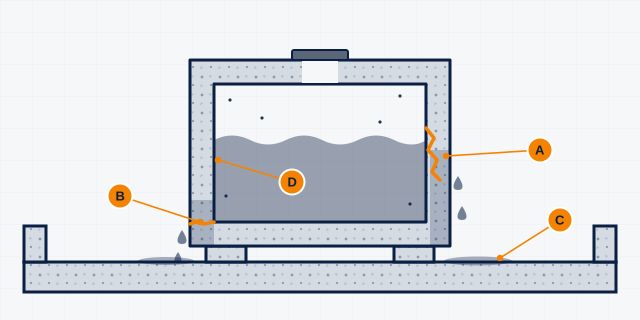
What goes wrong
- A: Cracks in the walls let water seep out and stain the outside face.
- B: The wall-to-floor joint is the weakest line and often leaks.
- C: Leaking water soaks the roof slab under the tank and can leak into the house below.
- D: Bare, porous concrete inside the tank is hard to keep clean and lets water in.
How the system works
Leaks are plugged and damaged concrete repaired first. Then the whole inside is lined with a coating approved for contact with drinking water. It bonds to the concrete and forms one continuous, cleanable, watertight skin. Only certified products touch the water.
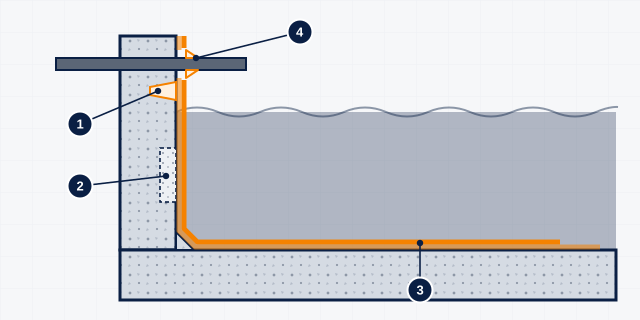
The system, layer by layer
-
Layer 1: Running leaks plugged
What it does: A rapid-setting plug stops water running through holes and static cracks.
Why it is needed here: No coating can be applied over running water. The plug must then be covered by the lining.
- SikaSet Waterplug TDS uses: 'Non-moving (static) cracks and holes with running water or moisture seepage'; 'For immersion service'; certified to NSF/ANSI 61 for potable water contact (p.1).
-
Layer 2: Damaged concrete repaired
What it does: Spalled or honeycombed areas are rebuilt with a repair mortar.
Why it is needed here: The lining needs a sound, even surface. Repair mortars do not touch the water: the lining covers them.
Concrete repair mortar: Ask us for the right product
-
Layer 3: Drinking-water lining on all inside faces
What it does: A coating certified for potable-water contact, applied in two coats over walls, floor, coves and roof underside.
Why it is needed here: This is the waterproof barrier and the only surface the water touches, so it must carry a drinking-water approval.
- SikaTop-550 Seal TDS: 'As a waterproof lining for water retaining structures' and 'BS 6920: Part 1 2000 - Suitable for use in contact with potable water' (p.1).
- Sikagard PW Professionals only TDS: 'Lining in storage tanks, manholes, intakes and silos' and 'Suitable for direct contact with potable water' (p.1); experienced professionals only (p.1).
-
Layer 4: Joints and pipe entries sealed
What it does: A drinking-water approved elastic sealant around pipes and in joints.
Why it is needed here: Pipes and joints move and are the usual leak points; the sealant keeps them watertight. Prime it for water immersion as its data sheet requires.
- Sikaflex PRO-3 WF TDS approvals: 'BS 6920 (drinking water contact)' (p.1); priming required for water immersion (p.4).
Common mistakes to avoid
- Letting any product other than the approved lining and sealant touch the drinking water. Repair mortars and the plug must be covered (owner rule; SikaTop-550 Seal p.1; Sikagard PW p.1; Sikaflex PRO-3 WF p.1).
- Using the plug on moving cracks or joints, or as a surface coating (SikaSet Waterplug p.2).
- Applying Sikagard PW on damp substrates or with rising moisture, or wetting it within 24 hours (Sikagard PW p.3).
- Lining in direct sun or strong wind (SikaTop-550 Seal p.2). Clean and disinfect to local rules before refilling.
Products are named only where the data sheet confirms the use (verified); other layers say "Ask us". Diagrams are schematic, not to scale. Draft pending technical sign-off.
You need this when…
- Damp patches or seelan on the ceiling or walls under the tank
- Water dripping from the tank base, outlet or overflow pipes
- Cracks, rust stains or spalled concrete on the tank walls
- Algae, slime or flaking old paint inside the tank
- Water level drops with all taps closed
The work, step by step
General guidance based on the manufacturer data sheets. Site conditions differ: confirm the system with MCT before you start. Where we do not name a product, ask us and we will confirm the right one.
-
Step 1: Empty, clean and inspect
Drain the tank and close the supply. Remove sludge, algae, loose concrete, laitance and old coatings by high-pressure water jetting, wire brushing or grinding (SikaTop-550 Seal p.3). Mark cracks, honeycombing, leaking pipe entries and exposed steel. If the slab under the tank or its supports are cracked, or the steel is badly rusted, an engineer must assess it before any lining work.
-
Step 2: Plug running leaks
Plug holes and static cracks that still run water with a quick-setting hydraulic plug. SikaSet Waterplug stops running water through holes and cracks and is certified to NSF/ANSI 61 for potable water contact (SikaSet Waterplug p.1). It is later covered by the lining.
SikaSet Waterplug Sika Request a quotation -
Step 3: Repair damaged concrete
Clean exposed steel, then rebuild spalled or honeycombed areas with a repair mortar from the SikaRep or MonoTop range, as the lining data sheet requires (SikaTop-550 Seal p.3). In summer heat above 35 °C, store MonoTop-612 in the shade and mix with chilled water (Sika MonoTop-612 PK p.2). Close blowholes with a pore sealer (SikaRep Fine PK p.1).
Product for this stepAsk us The right product here depends on your site. We confirm it before naming it.
-
Step 4: Line the inside with a drinking-water coating
Coat walls, floor and the underside of the roof slab. SikaTop-550 Seal is approved to BS 6920 for potable water contact (p.1); apply at least 2 layers (p.2) on a pre-dampened surface in hot weather (p.3). Sikagard PW epoxy is suitable for direct potable water contact (p.1) but is for experienced professionals only (p.1) and needs concrete of at least 25 N/mm² with 1.5 N/mm² pull-off (Sikagard PW p.3).
SikaTop-550 Seal Sika As a waterproof lining for water retaining structures. (TDS p.1)
- Temperature stated in TDS
- +5°C min. / 40°C max (TDS p.2)
Sikagard PW Sika Professionals only Chemical resistant protective layer on concrete, structural cementitious mortars, epoxy cement, epoxy resin based products and steel Protection of concrete surfaces / foundations below ground level Lining in storage tanks, manholes, intakes and silos etc. (TDS p.1)
- Temperature stated in TDS
- +5 °C min. / +40 °C max (TDS p.2)
-
Step 5: Seal joints and pipe entries
Seal joints and the gaps around inlet, outlet and overflow pipes with Sikaflex PRO-3 WF, tested to BS 6920 for drinking water contact (p.1), over a closed-cell backer rod. For water immersion the data sheet asks for priming and pre-treatment (Sikaflex PRO-3 WF p.4). Never use Sika Polysulphide GG or PG here ('do not use in contact with drinking water', GG p.2) or Sikaflex Tank N, which is made for water-polluting liquids (p.1).
Sikaflex PRO-3 WF Sika Request a quotation Sikaflex® PRO-3 WF is designed for movement and connection joints in floors, pedestrian and traffic areas (e.g. (TDS p.1)
- Temperature stated in TDS
- 40 °C min. / +70 °C max (TDS p.2)
-
Step 6: Cure, clean, disinfect and refill
Protect the lining from direct sun, strong wind and rain while it hardens (SikaTop-550 Seal p.2). Keep Sikagard PW away from damp, condensation and water for at least 24 hours (Sikagard PW p.3). Clean and disinfect the tank as local rules require before refilling (Sikagard PW p.3).
Proposal brief
Overhead water tank (drinking water): scope and system
A starting point for a site proposal. Quantities, prices and the final specification follow a site visit or photos.
Scope of work
- Draining, cleaning and inspection of the tank (internal area in m²)
- Plugging of active leaks and repair of spalled or honeycombed concrete
- Drinking-water lining to walls, floor and underside of the roof slab
- Sealing of joints and pipe entries
- Curing and hand-over for cleaning and disinfection
System build-up
| Step | Product | Pack | Source |
|---|---|---|---|
| 2. Plug running leaks | SikaSet Waterplug | — | TDS p.1 · September 2024, Version 02.01 |
| 4. Line the inside with a drinking-water coating | SikaTop-550 Seal | — | TDS p.1 · March 2024, Version 01.01 |
| 4. Line the inside with a drinking-water coating | Sikagard PW (professionals) | — | TDS p.1 · May 2021, Version 02.01 |
| 5. Seal joints and pipe entries | Sikaflex PRO-3 WF | — | TDS p.1 · May 2021, Version 02.01 |
What we need from you
- Tank size (length × width × height) or capacity in gallons or litres
- Photos of the inside, the outside and the ceiling below
- Age of the tank and any old coating
- Confirm it stores drinking water (this decides the products)
- How long the tank can be out of service
Site conditions
- Tank emptied and kept dry during the work
- Application between +5 °C and +40 °C, out of direct sun and strong wind (SikaTop-550 Seal p.2)
- For Sikagard PW: sound concrete of at least 25 N/mm² and 1.5 N/mm² pull-off, no rising moisture (Sikagard PW p.3)
Not included
- Structural repair of the tank slab or supports (quoted after an engineer's assessment)
- Plumbing, valves, float switches and pipe replacement
- Disinfection and water-quality testing to local rules
Questions customers ask
Is the lining safe for drinking water?
We only use products whose data sheet says so: SikaTop-550 Seal is approved to BS 6920 for potable water contact (p.1) and Sikagard PW is suitable for direct potable water contact (p.1). Local cleaning and disinfection rules still apply before refilling (Sikagard PW p.3).
Can our own mistri apply it?
SikaTop-550 Seal is applied by brush, roller or trowel (p.1), so a careful mistri can apply it with guidance. Sikagard PW may only be used by experienced professionals (p.1), so it needs a trained applicator.
How soon can we refill the tank?
Sikagard PW must be protected from water for at least 24 hours (p.3). The SikaTop-550 Seal data sheet gives the time between coats (about 6 hours at +20 °C, about 3 hours at +30 °C, p.2) but no refill time. Ask us: it depends on site conditions.
Can we use a cheaper polysulphide sealant for the joints?
No. The polysulphide data sheets say 'do not use in contact with drinking water or food' (Sika Polysulphide GG p.2; PG p.2). Use Sikaflex PRO-3 WF, which is tested to BS 6920 (p.1).
The tank is in full sun on the roof. Does the heat matter?
Yes. SikaTop-550 Seal is applied between +5 °C and +40 °C and not in direct sun (p.2), and the surface must be pre-dampened in hot climates (p.3). Work early in the morning or under shade in summer.
Steps and product facts are taken from the manufacturer data sheets (page cited). Products are named only where the data sheet confirms the use; quantities follow a site visit or photos. General guidance: check the data sheet or ask us before you start.