

The right product here depends on your site. We confirm it before naming it.
Step-by-step solution
Shower area & walk-in shower
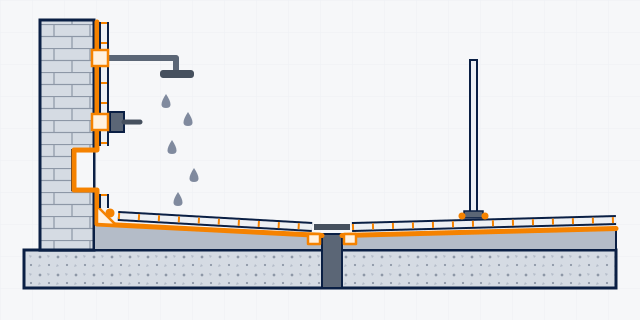
The shower is the wettest spot in the house: floor, walls, niche and drain are soaked every day. It needs a continuous waterproof layer from floor to wall, epoxy grout and a mildew-resistant sealant at every corner.
- 6 steps
- 7 products
- 4 answers
You need this when…
- Leak below or beside the shower only when it is used
- Black mould in grout and silicone
- Grout washing out at the floor-wall corner
- Water escaping past the glass screen or shower tray
- Loose tiles in the shower niche or bench
The work, step by step
General guidance based on the manufacturer data sheets. Site conditions differ: confirm the system with MCT before you start. Where we do not name a product, ask us and we will confirm the right one.
-
Step 1: Prepare the floor with a fall
Strip to a sound substrate. Fix and test the drain body and mixer pipes. Lay the screed with a fall to the drain; Sika-1 PK can waterproof screeds (p.1).
Product for this stepAsk us -
Step 2: Seal cracks and old joints
Fill non-structural cracks up to 10 mm with Sikadur-20 Crack Seal (wet rooms, p.1; concrete at least 28 days old, p.2).
Sikadur-20 Crack Seal Sika Request a quotation To fill and seal non-structural crack and cavities in structural concrete such as concrete decks, balconies, concrete roof structures, wet room, swimming pool and especially before waterproofing works. (TDS p.1)
- Pack
- 160 mL and 850 mL set
-
Step 3: Waterproof floor and walls in one layer
Apply SikaTop-550 Seal (wet areas under tiling, p.1; at least 2 layers, p.2) or SikaSeal-105 PK (bathrooms, p.1) continuously from the floor up the walls to full shower height. Add an extra coat at corners, the niche, the mixer valve and the drain. For tiling on walls over SikaTop-550, ask us first (p.2).
SikaTop-550 Seal Sika As a waterproof lining for water retaining structures. (TDS p.1)
- Temperature stated in TDS
- +5°C min. / 40°C max (TDS p.2)
SikaSeal-105 PK Sika SikaSeal®-105 PK is used as an economical and easy to use as waterproofing slurry both for external and internal applications. SikaSeal®-105 PK is suitable for the following applications: Water and sewage works, such as tanks and manholes, Basements and lift pits, Retaining walls and bridge struc… (TDS p.1)
- Temperature stated in TDS
- +5 °C min. / +40 °C max (TDS p.2)
-
Step 4: Fix the tiles
Use SikaCeram-205 PK, a flexible adhesive (p.1). On plaster, the plaster must be at least 10 mm thick with no more than 5 % moisture (p.2). See the Wall tiles guide.
Product for this stepAsk us The right product here depends on your site. We confirm it before naming it.
-
Step 5: Epoxy grout
SikaCeram-850 Design lists wet rooms (p.1); joints must be dry and not damp to touch (p.2). SikaCeram-855 is for indoor wet areas only (p.1).
SikaCeram-850 Design Sika Grouting tiles for the following interior residential and commercial building applications: Wet rooms, Shopping malls, Hospitals, Commercial / Industrial kitchens, Food industry, Swimming pools (indoors). (TDS p.1)
- Temperature stated in TDS
- +5 °C min. / +35 °C max (TDS p.2)
- Pack
- 400 ml double side-by-side cartridge
SikaCeram-855 Sika Request a quotation Suitable for grouting applications on most types of ceramic, porcelain and non-absorbent tiles for indoor wet areas. (TDS p.1)
- Temperature stated in TDS
- +5 °C min. / +35 °C max (TDS p.2)
- Pack
- 350ML
-
Step 6: Seal corners, screen and tray
Seal the wall-floor corners, screen profiles and tray edges with Sikasil-715 WS, listed for wet area joints around sanitaryware (p.1), or Sika Sanisil, which resists mildew (p.1).
Sikasil-715 WS Sika Sikasil®-715 WS is designed for weather proofing and sealing applications where durability under severe conditions is required. (TDS p.1)
- Temperature stated in TDS
- +5 °C to +40 °C (TDS p.2)
- Pack
- 300 ml cartridge, 12 cartridges per box
Sika Sanisil Sika Request a quotation Sanitary or other sealing applications where mildew and fungus resistance is required Domestic kitchens For interior and exterior use (TDS p.1)
- Temperature stated in TDS
- +5 °C min. / +40 °C max (TDS p.2)
- Pack
- 300 ml cartridge: 12 cartridges per box
Proposal brief
Shower area & walk-in shower: scope and system
A starting point for a site proposal. Quantities, prices and the final specification follow a site visit or photos.
Scope of work
- Strip-out and screed to falls
- Crack sealing
- Continuous 2-coat waterproofing to floor and walls, full shower height
- Tile fixing and epoxy grouting
- Sealing of corners, screen and tray
System build-up
| Step | Product | Pack | Source |
|---|---|---|---|
| 2. Seal cracks and old joints | Sikadur-20 Crack Seal | 160 mL and 850 mL set | TDS p.1 · March 2025, Version 03.02 |
| 3. Waterproof floor and walls in one layer | SikaTop-550 Seal | — | TDS p.1 · March 2024, Version 01.01 |
| 3. Waterproof floor and walls in one layer | SikaSeal-105 PK | — | TDS p.1 · February 2026, Version 02.01 |
| 5. Epoxy grout | SikaCeram-850 Design | 400 ml double side-by-side cartridge | TDS p.1 · April 2025, Version 01.01 |
| 5. Epoxy grout | SikaCeram-855 | 350ML | TDS p.1 · September 2025, Version 03.01 |
| 6. Seal corners, screen and tray | Sikasil-715 WS | 300 ml cartridge, 12 cartridges per box | TDS p.1 · May 2025, Version 03.01 |
| 6. Seal corners, screen and tray | Sika Sanisil | 300 ml cartridge: 12 cartridges per box | TDS p.1 · May 2021, Version 03.01 |
What we need from you
- Shower size and wall height
- Wall type (brick plaster, concrete, board)
- Tray or tiled floor; linear or point drain
- Photos of the leak or damage
Site conditions
- Drain and pipes tested by the plumber before waterproofing
- Plaster at least 10 mm thick and no more than 5 % moisture (SikaCeram-205 PK p.2)
Not included
- Plumbing, mixer and glass screen supply
- Supply of tiles
Questions customers ask
Why epoxy grout in a shower?
SikaCeram-850 Design gives a durable, chemical-resistant surface for areas with high cleanliness needs (p.1), and it lists wet rooms (p.1).
Can we grout while the tiles are still damp from cleaning?
No. SikaCeram-850 Design needs dry, clean joints with no standing water, and the surface must not be damp to touch (p.2).
Which sealant goes between the tray and the wall?
Sikasil-715 WS is listed for wet area joints around sanitaryware (p.1). It is not for joints under water pressure or that stay under water (p.3).
Can we tile on gypsum board in the shower?
SikaCeram-90 PK must not be used directly on gypsum or gypsum board (p.2). Ask us: it depends on site conditions.
Steps and product facts are taken from the manufacturer data sheets (page cited). Products are named only where the data sheet confirms the use; quantities follow a site visit or photos. General guidance: check the data sheet or ask us before you start.