

Non-moving (static) cracks and holes with running water or moisture seepage For immersion service For anchoring vertical bolts Basements Foundations Retaining walls Sewers Locations Vertical, overhead, or horizontal Interior or exterior Above or below grade… (TDS p.1)
Step-by-step solution
Basement waterproofing from inside (negative side)
In an existing basement where the outside cannot be dug out, water is stopped on the inside face. Plug active leaks, inject leaking cracks, then apply a cement-based coating that works against water pressure from behind.
- 7 steps
- 4 products
- 4 answers
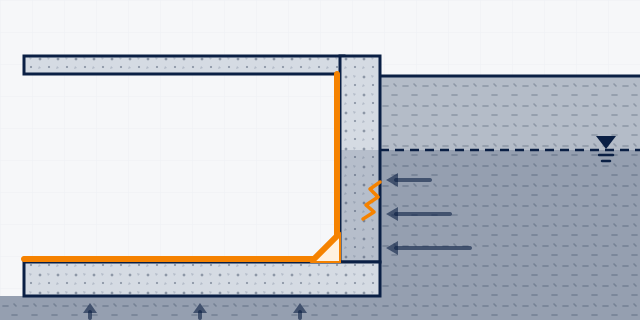
How the system works
The problem, and the system that solves it
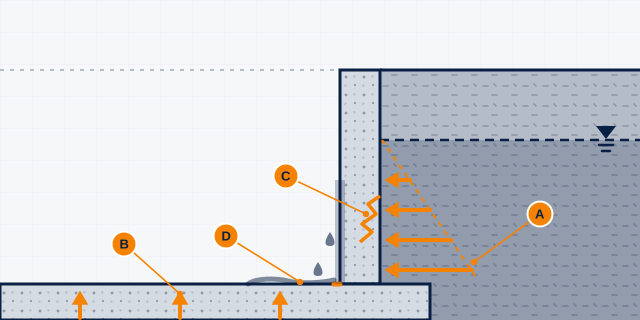
What goes wrong
- A: Below the water table, ground water presses on the walls; the pressure grows with depth.
- B: The same water pushes up under the floor slab.
- C: Cracks in the wall let the water through.
- D: The wall-to-floor joint is the weakest line, so water collects on the floor.
How the system works
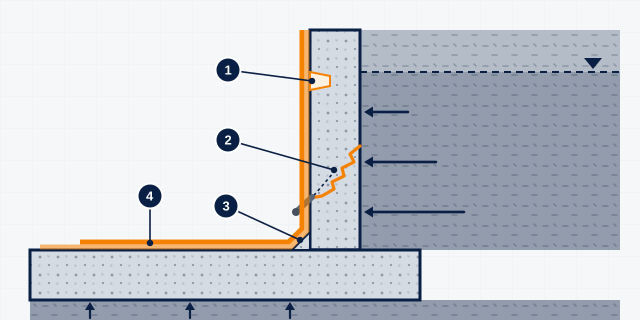
When the outside face cannot be reached, the basement is waterproofed from the inside (the negative side). Running leaks are stopped and cracks injected first. Then a cementitious coating designed to resist water pressure from behind is bonded to the inside walls and floor. It forms one continuous tank with a coved corner.
The system, layer by layer
-
Layer 1: Running water stopped
What it does: A rapid-setting plug seals holes and static cracks that run with water.
Why it is needed here: Coatings cannot be applied over flowing water; the leak has to stop first.
- SikaSet Waterplug TDS: for 'Non-moving (static) cracks and holes with running water or moisture seepage' in 'Basements', above or below grade (p.1)
-
Layer 2: Leaking cracks injected
What it does: Packers drilled at an angle meet the crack; a resin is injected that seals the water-bearing crack.
Why it is needed here: Injection seals the crack through its depth, so water cannot bypass the coating. This is professional work.
- Sika Injection-306 Professionals only TDS: 'Sealing water-bearing cracks and voids'; 'Sealing leaks where there is some minor movement'; 'leaking building components in damp or water saturated ground' (p.1)
-
Layer 3: Coved wall-to-floor joint
What it does: A rounded mortar fillet in the internal corner.
Why it is needed here: A sharp corner is where coatings crack; the cove lets the coating run unbroken from wall to floor.
Repair mortar cove: Ask us for the right product
-
Layer 4: Inside waterproof coating, two coats
What it does: A cementitious coating bonded to the inside faces that resists water pressure from behind.
Why it is needed here: On the inside, the water pushes the coating away from the wall, so it must be a system rated for negative pressure.
- SikaSeal-105 PK TDS: slurry for 'Basements and lift pits' that 'can be used against positive and negative water pressure' (p.1)
- Sika Thoroseal Plus TDS: cement-based coating that 'resists both positive and negative hydrostatic pressure'; uses include 'Basements' (p.1)
Common mistakes to avoid
- Coating while water is still running through the wall (Sika Thoroseal Plus p.2).
- Using the plug on moving cracks or expansion joints, or as a coating (SikaSet Waterplug p.2).
- Applying SikaSeal-105 PK on weak substrates (pull-off below 1.0 N/mm²), in direct sun or strong wind, or adding water (SikaSeal-105 PK p.2).
- Injection by non-professionals: the resin is for experienced professionals only (Sika Injection-306 p.1).
Products are named only where the data sheet confirms the use (verified); other layers say "Ask us". Diagrams are schematic, not to scale. Draft pending technical sign-off.
You need this when…
- Water seeping or running through basement walls or floor
- Wet line at the wall-floor junction
- Leaking tie-rod holes or construction joints
- Plaster and paint falling off basement walls
- Basement floods or stays damp during the monsoon
The work, step by step
General guidance based on the manufacturer data sheets. Site conditions differ: confirm the system with MCT before you start. Where we do not name a product, ask us and we will confirm the right one.
-
Step 1: Survey the leaks
Map every wet crack, joint, hole and pipe entry, and note whether water is running or just seeping. Structural cracks or settlement need an engineer's assessment.
-
Step 2: Stop running water
Cut leaking holes and static cracks to at least 19 mm wide and deep, square or undercut, and press in a fast-setting hydraulic plug (SikaSet Waterplug p.1, p.3). Where water infiltration is heavy, use a rapid-setting mix of Sika-4a and fresh Portland cement. Divert the water through temporary plastic tubes, then plug them last (Sika-4a p.1, p.2).
SikaSet Waterplug Sika Request a quotation Other options for this stepAsk us The right product here depends on your site. We confirm it before naming it.
-
Step 3: Inject leaking cracks and joints
Seal water-bearing cracks and joints, including ones with minor movement, with an elastic acrylic injection resin. This is for experienced professionals only (Sika Injection-306 p.1).
Sika Injection-306 Sika Professionals only Request a quotation Crack and joint injection Injection of SikaFuko® injection hoses to seal construction joints Sealing water-bearing cracks and voids Sealing all types of leaking building components in damp or water saturated ground conditions Sealing leaks where there is so… (TDS p.1)
- Temperature stated in TDS
- +5 °C min. / +40 °C max (TDS p.2)
-
Step 4: Prepare the surface
Remove plaster, paint and laitance mechanically, e.g. by high-pressure water jetting. The base must have at least 1.0 N/mm² pull-off. Saturate it with water, then remove standing water (SikaSeal-105 PK p.2).
-
Step 5: Form a cove at the wall-floor joint
Route the junction to at least 19 mm wide and deep, fill it with the hydraulic plug and shape it into a cove (SikaSet Waterplug p.3).
SikaSet Waterplug is used again here; data and quotation in step 2. Go to step 2
-
Step 6: Apply the inside waterproof coating
Use a coating that states negative-pressure use. Options: SikaSeal-105 PK, 3.0–6.0 kg/m² in total depending on water head (SikaSeal-105 PK p.1, p.2); SikaTop-501 Seal, 2 coats, kept wet for 5–7 days (SikaTop-501 Seal p.1, p.2); or Sika Thoroseal Plus (Sika Thoroseal Plus p.1).
SikaSeal-105 PK Sika SikaSeal®-105 PK is used as an economical and easy to use as waterproofing slurry both for external and internal applications. SikaSeal®-105 PK is suitable for the following applications: Water and sewage works, such as tanks and manholes, Basements and lift pits, Retaining walls and bridge struc… (TDS p.1)
- Temperature stated in TDS
- +5 °C min. / +40 °C max (TDS p.2)
Sika Thoroseal Plus Sika Request a quotation Diverse building substrates Walls Foundations Tunnels Basements Blocks, bricks, stone and concrete Concrete High tanks Interior and exterior (TDS p.1)
- Pack
- 35 lb (15.9 kg) pail
Other options for this stepAsk us The right product here depends on your site. We confirm it before naming it.
-
Step 7: Cure and finish
Protect from drying out with polythene sheet or a curing compound (SikaSeal-105 PK p.3). Do not use curing compounds on SikaTop-501 Seal (SikaTop-501 Seal p.2). Wait about 5–7 days before painting (SikaSeal-105 PK p.2).
Proposal brief
Basement waterproofing from inside (negative side): scope and system
A starting point for a site proposal. Quantities, prices and the final specification follow a site visit or photos.
Scope of work
- Leak survey and marking
- Plugging of active leaks and cutting of static cracks
- Injection of leaking cracks and joints (x m)
- Surface preparation of x m² walls and floor
- Cove at the wall-floor junction
- Two-coat negative-side waterproofing and curing
System build-up
| Step | Product | Pack | Source |
|---|---|---|---|
| 2. Stop running water | SikaSet Waterplug | — | TDS p.1 · September 2024, Version 02.01 |
| 3. Inject leaking cracks and joints | Sika Injection-306 (professionals) | — | TDS p.1 · May 2021, Version 02.01 |
| 5. Form a cove at the wall-floor joint | SikaSet Waterplug | — | TDS p.1 · September 2024, Version 02.01 |
| 6. Apply the inside waterproof coating | SikaSeal-105 PK | — | TDS p.1 · February 2026, Version 02.01 |
| 6. Apply the inside waterproof coating | Sika Thoroseal Plus | 35 lb (15.9 kg) pail | TDS p.1 · September 2024, Version 02.01 |
What we need from you
- Basement wall and floor area (m²) and depth below ground
- Photos or video of the leaks, ideally during or after rain
- Does water run, drip or just seep? Any standing water?
- Pipe and cable entries; existing plaster or tiles
- How the basement will be used (storage, living, parking)
Site conditions
- Pumping out of standing water before work
- Temperature between +5 °C and +30 °C for SikaTop-501 Seal (SikaTop-501 Seal p.2)
- Ventilation for curing
Not included
- Structural repairs, which need an engineer
- Drainage pumps and sump installation
- Final plaster, tiles or paint, unless agreed
Questions customers ask
Can SikaTop-107 Seal PK be used on the inside of a wet basement?
Choose carefully. If the base it is applied to cannot dry, SikaTop-107 Seal PK will not cure into a waterproof layer (SikaTop-107 Seal PK p.2). SikaSeal-105 PK and SikaTop-501 Seal state use against negative water pressure (SikaSeal-105 PK p.1; SikaTop-501 Seal p.1).
How fast does the plug set?
SikaSet Waterplug sets in about 3–5 minutes, and faster in hot weather (SikaSet Waterplug p.2).
How thick should the coating be?
For water-retaining or pressure conditions, SikaSeal-105 PK is applied at 3.0–6.0 kg/m² in total, depending on water head, in at least 2 coats (SikaSeal-105 PK p.2).
Can we tile or paint after?
Wait about 5–7 days before painting SikaSeal-105 PK with a compatible decorative coating (SikaSeal-105 PK p.2). For tiles, ask us: it depends on site conditions.
Steps and product facts are taken from the manufacturer data sheets (page cited). Products are named only where the data sheet confirms the use; quantities follow a site visit or photos. General guidance: check the data sheet or ask us before you start.