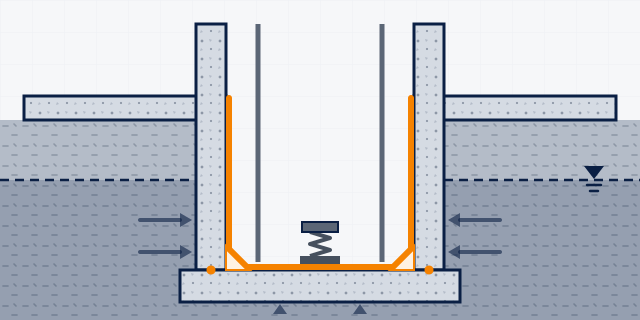
You need this when…
- Water standing at the bottom of the lift pit
- Seepage at the joint between pit floor and walls
- Rust on lift rails or buffers in the pit
- Damp walls and smell around a drainage sump
The work, step by step
General guidance based on the manufacturer data sheets. Site conditions differ: confirm the system with MCT before you start. Where we do not name a product, ask us and we will confirm the right one.
-
1
Step 1: New pits: build them watertight
Add a crystalline admixture to the pit concrete (SikaControl-760 p.1). Seal the floor-wall construction joint with a swelling sealant at the centre of the wall, with at least 8 cm cover (SikaSwell S-2 p.1, p.2), or with a waterbar (Sika Waterbar V-20 L SH p.1).
Joint sealing: Construction joints, Pipe and steel work penetrations through walls and floor slabs, Around all types of penetrations and construction joints, Construction joints in cable ducts, etc. Fixing / Adhering swellable profiles:, SikaSwell® A Profiles, SikaSwell® P Profiles. (TDS p.1)
- Temperature stated in TDS
- +5 °C min. / +35 °C max (TDS p.2)
- Pack
- 600 ml unipacs
Other options for this stepAsk usThe right product here depends on your site. We confirm it before naming it.
-
2
Step 2: Existing pits: pump out and stop leaks
Pump out the water. Plug running leaks in static cracks and holes (SikaSet Waterplug p.1, p.3). Where water infiltration is heavy, use Sika-4a with cement and temporary drainage tubes (Sika-4a p.1, p.2).
SikaSet Waterplug Sika
Request a quotation
Non-moving (static) cracks and holes with running water or moisture seepage For immersion service For anchoring vertical bolts Basements Foundations Retaining walls Sewers Locations Vertical, overhead, or horizontal Interior or exterior Above or below grade… (TDS p.1)
Other options for this stepAsk usThe right product here depends on your site. We confirm it before naming it.
-
3
Step 3: Inject leaking joints and cracks
Seal water-bearing cracks and joints with an acrylic injection resin. This is for experienced professionals only (Sika Injection-306 p.1).
Sika Injection-306 Sika
Professionals only Request a quotation
Crack and joint injection Injection of SikaFuko® injection hoses to seal construction joints Sealing water-bearing cracks and voids Sealing all types of leaking building components in damp or water saturated ground conditions Sealing leaks where there is so… (TDS p.1)
- Temperature stated in TDS
- +5 °C min. / +40 °C max (TDS p.2)
-
4
Step 4: Line the pit
Prepare and saturate the surface, then apply a slurry that lists lift pits and works against positive and negative water pressure, at 3.0–6.0 kg/m² in total depending on water head (SikaSeal-105 PK p.1, p.2). Alternatively, use a crystalline coating that lists elevator pits (SikaTop-501 Seal p.1).
SikaSeal®-105 PK is used as an economical and easy to use as waterproofing slurry both for external and internal applications. SikaSeal®-105 PK is suitable for the following applications: Water and sewage works, such as tanks and manholes, Basements and lift pits, Retaining walls and bridge struc… (TDS p.1)
- Temperature stated in TDS
- +5 °C min. / +40 °C max (TDS p.2)
SikaTop-501 Seal Sika
Request a quotation
Interior and exterior areas for vertical and horizontal applications Water tanks Tunnels Elevator pits Supporting walls, dams and harbors Wait for the appropriate ambient and substrate temperature if it is less then +5oC or more than +30oC. (TDS p.1,2)
- Pack
- 25 kg polyethylene reinforced kraft bag
-
5
Step 5: Seal pipes and fixings
Seal pipe entries with the hydraulic plug (SikaSet Waterplug p.1). Form a cove at the floor-wall junction (SikaSet Waterplug p.3). For new pits, place swelling seals around sleeves before pouring (SikaSwell S-2 p.1).
SikaSet Waterplug is used again here; data and quotation in step 2. Go to step 2
-
6
Step 6: Cure, then hand back to the lift contractor
Keep SikaTop-501 Seal wet for 5–7 days, without curing compounds (SikaTop-501 Seal p.2). Protect SikaSeal-105 PK from drying out with polythene sheet (SikaSeal-105 PK p.3).
Proposal brief
Lift pits and drainage sumps: scope and system
A starting point for a site proposal. Quantities, prices and the final specification follow a site visit or photos.
Scope of work
- Pump-out and leak survey
- Leak plugging and crack injection
- Cove at the floor-wall junction
- Two-coat lining of x m² pit surfaces
- Sealing of pipe and fixing penetrations
System build-up
| Step | Product | Pack | Source |
|---|
| 1. New pits: build them watertight | SikaSwell S-2 | 600 ml unipacs | TDS p.1 · May 2021, Version 02.01 |
| 2. Existing pits: pump out and stop leaks | SikaSet Waterplug | — | TDS p.1 · September 2024, Version 02.01 |
| 3. Inject leaking joints and cracks | Sika Injection-306 (professionals) | — | TDS p.1 · May 2021, Version 02.01 |
| 4. Line the pit | SikaSeal-105 PK | — | TDS p.1 · February 2026, Version 02.01 |
| 4. Line the pit | SikaTop-501 Seal | 25 kg polyethylene reinforced kraft bag | TDS p.1,2 · November 2024, Version 02.02 |
| 5. Seal pipes and fixings | SikaSet Waterplug | — | TDS p.1 · September 2024, Version 02.01 |
What we need from you
- Pit or sump size (L x W x depth)
- Photos of the leaks and water level
- Is the lift in service? Who is the lift contractor?
- What does the sump hold: groundwater, storm water or sewage?
Site conditions
- Lift isolated and safe access provided
- Pit kept pumped dry during work
- Ventilation in the pit
Not included
- Lift equipment removal and refitting
- Pumps and float switches
- Structural repairs, which need an engineer
Questions customers ask
Can the lining be done from inside without digging?
Yes. SikaSeal-105 PK works against both positive and negative water pressure and lists basements and lift pits (SikaSeal-105 PK p.1).
How long is the pit out of service?
SikaTop-501 Seal becomes watertight after about 7 days at +23 °C (SikaTop-501 Seal p.2). The total time depends on the leaks found: ask us.
Is this suitable for a sewage sump?
SikaSeal-105 PK lists water and sewage works such as tanks and manholes (SikaSeal-105 PK p.1). For chemically aggressive sewage, ask us: it depends on site conditions.
Steps and product facts are taken from the manufacturer data sheets (page cited). Products are named only where the data sheet confirms the use; quantities follow a site visit or photos. General guidance: check the data sheet or ask us before you start.