

SikaGrout®-114 PK is used for grouting in the following: Machine foundations, Columns in pre-cast construction, Concrete anchors, cavities, gaps, and recesses, Base plates, General concrete repairs, Bridge bearing pads. (TDS p.1)
Step-by-step solution
Base plate & bearing grouting
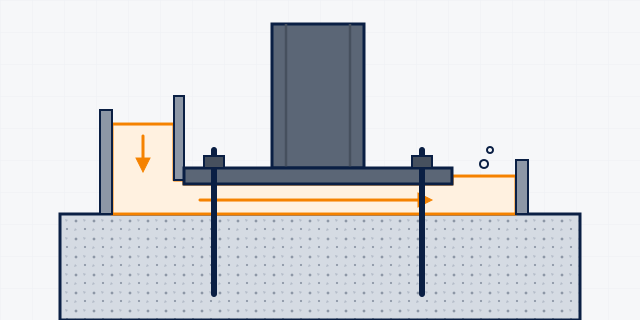
Steel columns, bridge bearings and equipment sit on a layer of non-shrink grout that carries the load into the foundation. Choose the grout by gap depth, mix it with only the specified water, and pour it continuously from one side.
- 7 steps
- 5 products
- 5 answers
You need this when…
- Gap left under steel column base plates after levelling
- Hollow sound or cracked grout under existing base plates
- Bridge bearing pads need bedding
- Precast column sockets to be filled
The work, step by step
General guidance based on the manufacturer data sheets. Site conditions differ: confirm the system with MCT before you start. Where we do not name a product, ask us and we will confirm the right one.
-
Step 1: Prepare the foundation
Concrete must be clean, sound and rough, with laitance removed; saturate absorbent surfaces with clean water (SikaGrout-114 PK p.2). For SikaGrout-951, scrabble the surface, soak it for 24 hours, leave it damp with no standing water and blow out bolt holes (p.2).
-
Step 2: Build tight formwork
Formwork must be secure and watertight to stop movement and leaks (SikaGrout-114 PK p.2). Leave about 10 cm between form and plate on the pouring side and 5–10 cm on the far side (SikaGrout-951 p.2).
-
Step 3: Choose the grout by gap depth
10–50 mm per pour: SikaGrout-114 PK (≥65 MPa at 28 days, p.1, p.2) or SikaGrout-275 PK for higher early strength (p.1, p.2). SikaGrout-928 PK is poured 10–50 mm per pour between plate and foundation (SikaGrout-928 PK p.2). SikaGrout-951 (≥90 N/mm²) is laid 20–100 mm (p.1, p.2).
SikaGrout-114 PK Sika SikaGrout-275 PK Sika SikaGrout®-275 PK precision grout is used for grouting various applications such as: Machine foundations, Coloumns in precast costruction, Concrete anchors, Cavities, gaps and recesses, Base plates, Bridge bearing. (TDS p.1)
- Temperature stated in TDS
- +5 °C min. / +35 °C max (TDS p.2)
SikaGrout-928 PK Sika SikaGrout®-928 PKprecision grout is used for grouting various applications such as: Machine foundations, Coloumns in precast costruction, Concrete anchors, Cavities, gaps and recesses, Base plates, Bridge bearing. (TDS p.1,2)
- Temperature stated in TDS
- +5 °C min. / +35 °C max (TDS p.2)
- Pack
- 25kg
Other options for this stepAsk us The right product here depends on your site. We confirm it before naming it.
-
Step 4: Deep gaps and pockets
Above 100 mm use Sikacrete-114 PK micro-concrete (SikaGrout-275 PK p.2), placed 50–500 mm per pour (Sikacrete-114 PK p.2). For site-batched cement grouts under bearing plates, Sika Intraplast Z PK adds expansion and flow; set its dosage by trial mixes (p.1, p.2).
Sikacrete-114 PK Sika Sikacrete®-114 PK is used for the structural repair of deteriorated concrete. (TDS p.1)
- Temperature stated in TDS
- +5 °C min. / +35 °C max (TDS p.2)
Sika Intraplast Z PK Sika Request a quotation Intraplast Z is used to increase cohesion in cement grouts and is suitable for use in the grouting of : Pre-stressed cable ducts, Rock and soil anchoring, Bearing plates, Pre-placed aggregates, Tunnel linings, Pre-cast concrete elements. (TDS p.1)
- Pack
- 10 kg bag
-
Step 5: Mix correctly
Mix in a forced-action mixer or slow paddle for 2–3 minutes, never more than 5. Mix full bags only, never add extra water, and mix only what can be placed in 15–20 minutes (SikaGrout-114 PK p.3). Let the grout stand about 5 minutes to release air (p.3).
-
Step 6: Pour from one side
Pour so the grout travels the shortest distance, keep a head of pressure so it keeps flowing, and let displaced air escape (SikaGrout-114 PK p.3). With SikaGrout-951 keep a head of at least 15 cm and do not vibrate (p.2).
-
Step 7: Cure
Cover exposed grout with a curing compound, polythene sheeting or wet hessian; do not start fogging until final set (SikaGrout-114 PK p.3).
Proposal brief
Base plate & bearing grouting: scope and system
A starting point for a site proposal. Quantities, prices and the final specification follow a site visit or photos.
Scope of work
- Surface preparation and pre-soaking
- Formwork and header boxes for grouting
- Supply and placing of non-shrink grout or micro-concrete
- Curing of exposed grout
- Removal of failed grout under existing plates (where applicable)
System build-up
| Step | Product | Pack | Source |
|---|---|---|---|
| 3. Choose the grout by gap depth | SikaGrout-114 PK | — | TDS p.1 · March 2026, Version 04.03 |
| 3. Choose the grout by gap depth | SikaGrout-275 PK | — | TDS p.1 · May 2025, Version 02.01 |
| 3. Choose the grout by gap depth | SikaGrout-928 PK | 25kg | TDS p.1,2 · June 2025, Version 04.01 |
| 4. Deep gaps and pockets | Sikacrete-114 PK | — | TDS p.1 · March 2026, Version 02.02 |
| 4. Deep gaps and pockets | Sika Intraplast Z PK | 10 kg bag | TDS p.1 · September 2023, Version 01.02 |
What we need from you
- Number and size of base plates or bearings
- Gap depth under each plate (mm)
- Drawings and the engineer's grout specification
- Access for mixing and pouring
- Planned erection or loading date
Site conditions
- Plates aligned and shimmed by the steel erector before grouting
- Grout temperature below 30 °C in hot weather (SikaGrout-114 PK p.2)
- No loading until the grout reaches the engineer's required strength
Not included
- Steel erection, levelling and shims
- Structural design
- Cube testing
Questions customers ask
Why not use ordinary sand–cement mortar?
A precision grout is made to flow under the plate and compensate shrinkage: SikaGrout-275 PK is free flowing and shrinkage compensated (p.1), with an expansion of +0.08 % at 28 days for SikaGrout-114 PK (p.2).
What is the maximum gap?
SikaGrout-114 PK and -275 PK are placed 10–50 mm per pour (p.2). Over 100 mm, use Sikacrete-114 PK (SikaGrout-275 PK p.2).
How strong is it?
SikaGrout-114 PK reaches ≥30 MPa at 1 day and ≥65 MPa at 28 days (p.1). SikaGrout-951 reaches ≥90 N/mm² at 28 days (p.1).
Can I add gravel to stretch the grout?
SikaGrout-114 PK allows clean, single-size coarse aggregate up to 100 % of the powder weight after trials (p.2).
How much water should I add?
Only what the TDS gives: SikaGrout-114 PK uses a water/powder ratio of 0.08–0.11 depending on the consistency needed (p.2). Never add more (p.3).
Steps and product facts are taken from the manufacturer data sheets (page cited). Products are named only where the data sheet confirms the use; quantities follow a site visit or photos. General guidance: check the data sheet or ask us before you start.